Build a brain
In this guide we make an introduction to Moveo.AI and explore the basic but powerful capabilities that the platform provides such that you can create an intelligent AI Agent!
Scenario
Assume that you own an online store and you would like to build a virtual assistant, which has two functions. The assistant should greet the users and can assist users to make online payments.
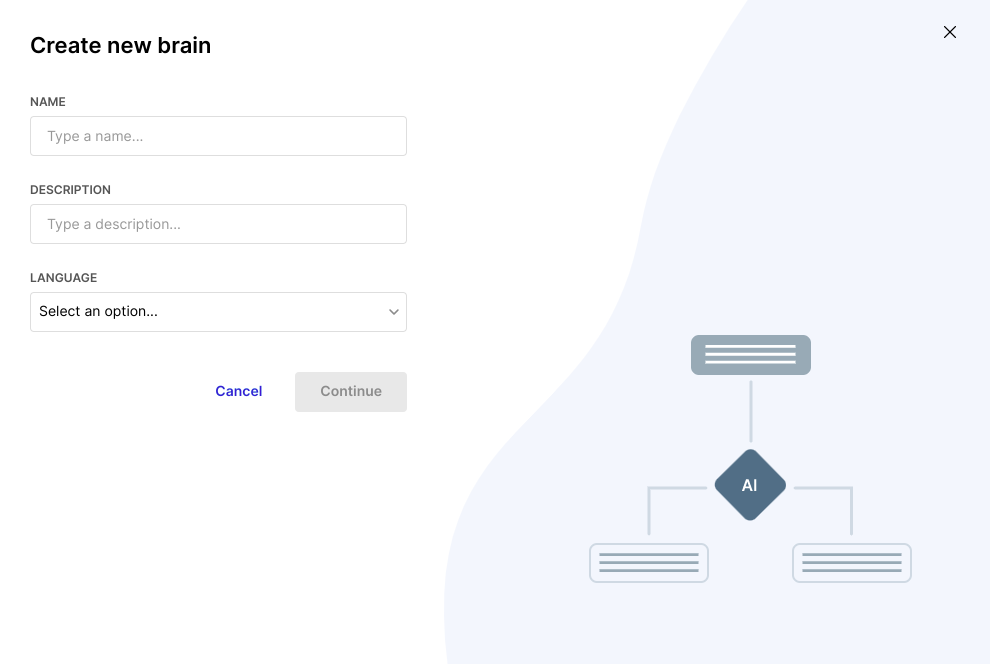
Create new brain
The first step is to create a new brain, which serves as the logic of your virtual assistant. To do so:
- Go to the brains menu.
- Click on + Create new brain.
- Come up with a name, description and select your language.
- Optional: Select a template to jump-start. For this example, you can see how to create a brain from scratch.
- Create new brain
- Pop-up
- Success
At this point, the status of the brain is Unavailable because it does not contain any data yet, and hence cannot be used.
Intents
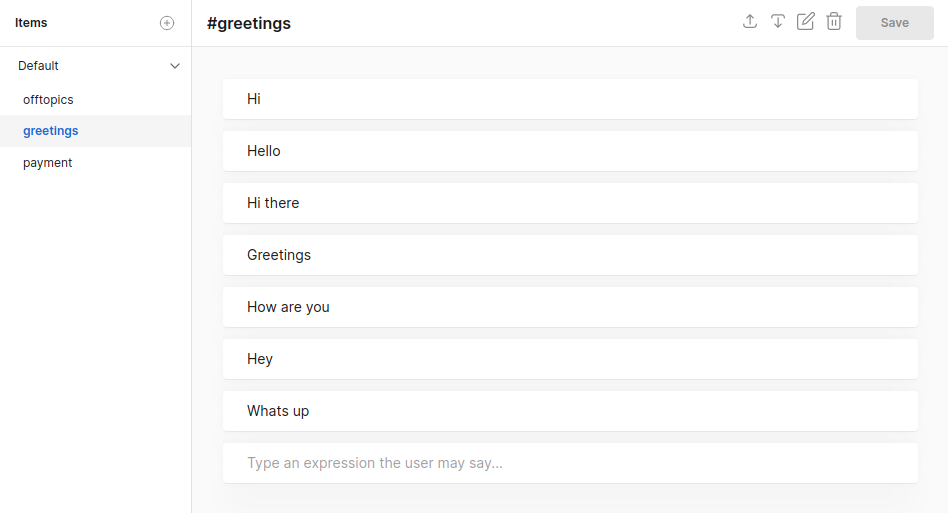
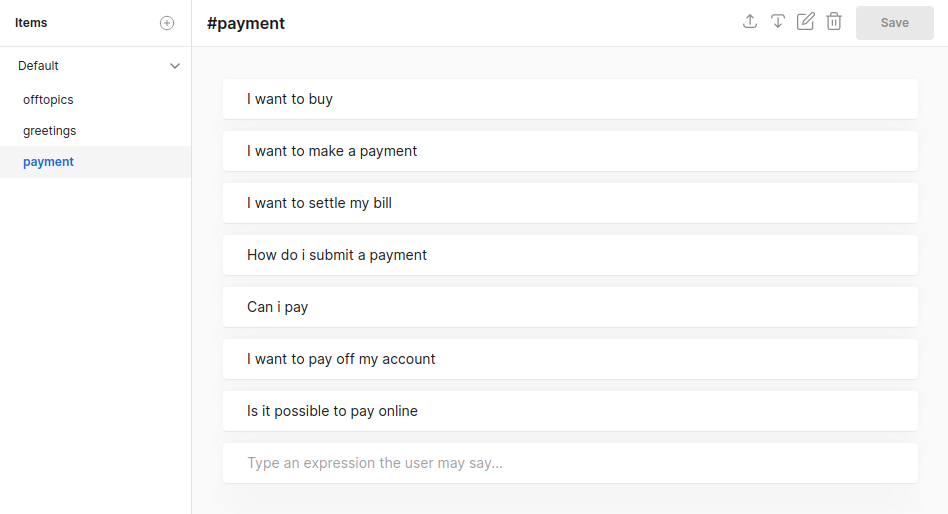
The next step is to create the two intents, which should consist of a few natural language expressions each. These expressions give the virtual assistant the ability to understand the user's messages and classify them correctly. Following the scenario, the two intents are the following:
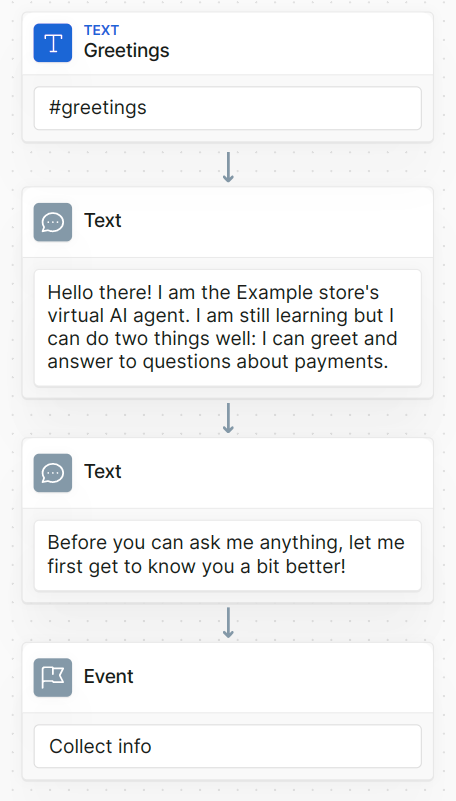
#greetings: Messages that greet the virtual assistant, like 'Hello', 'Hi, how are you?' etc.#payment: Messages that express the desire to make a payment, like: 'I want to make a new payment', 'How do I pay?', etc.
The images below show the possible implementation of the two intents.
- Greetings
- Payment
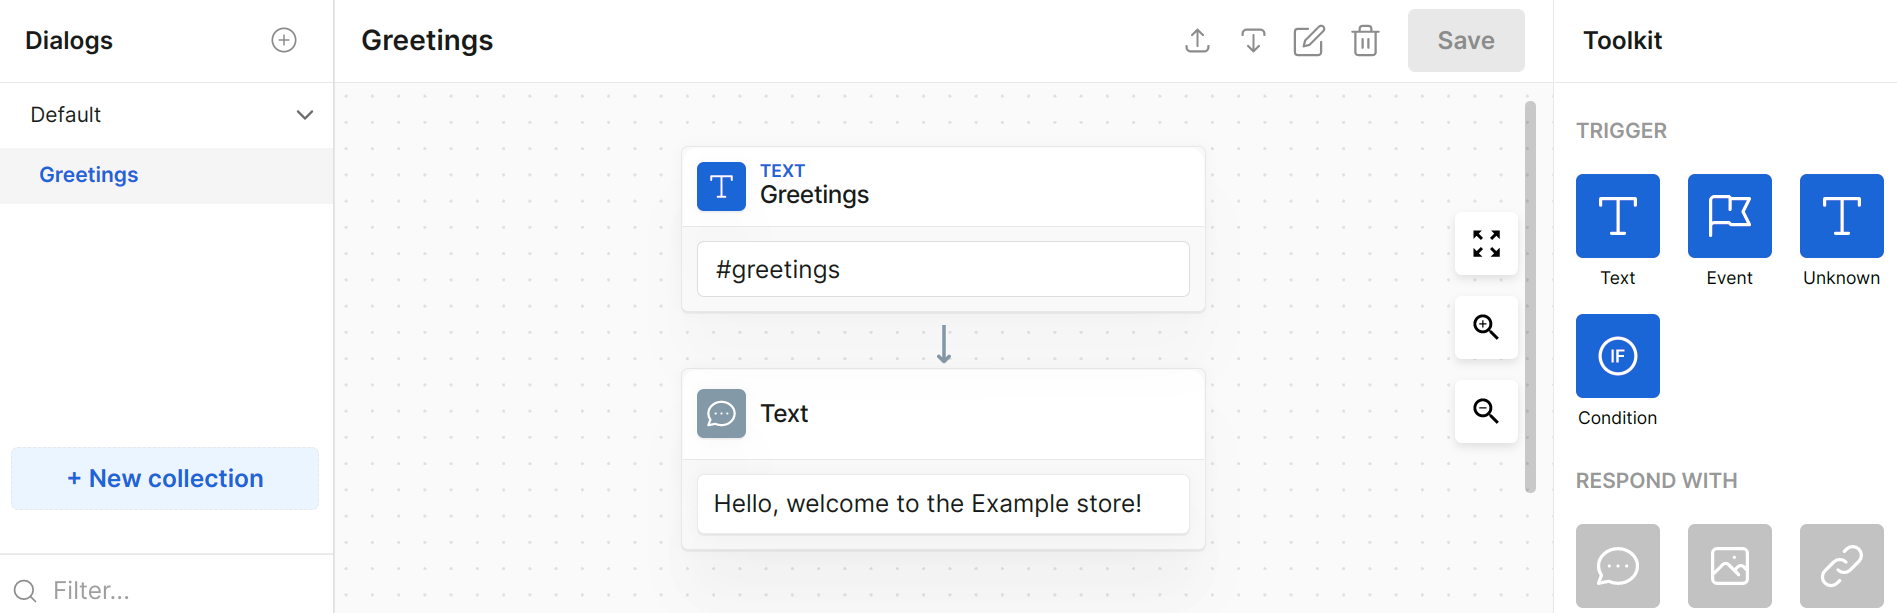
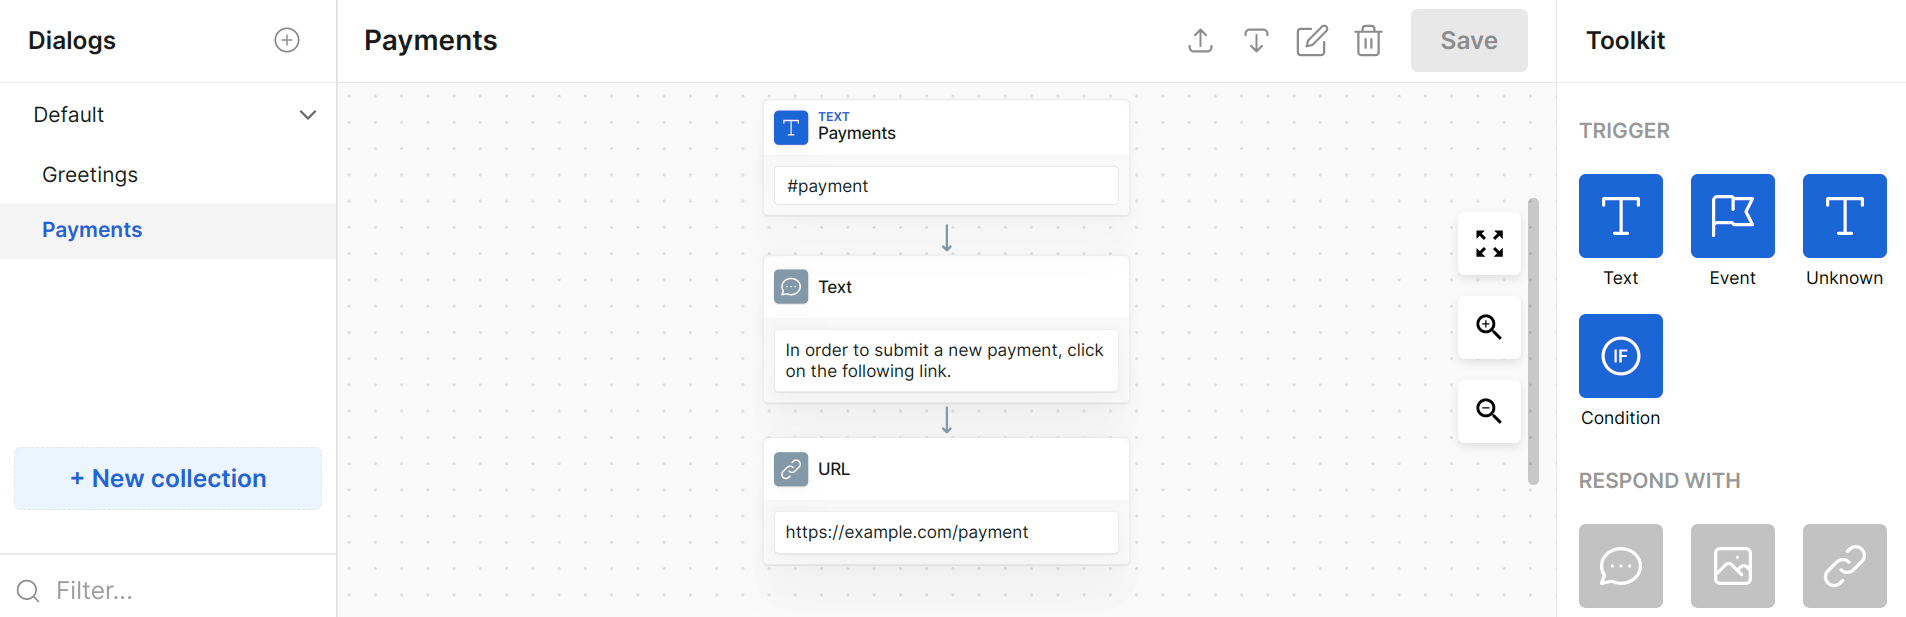
Dialogs
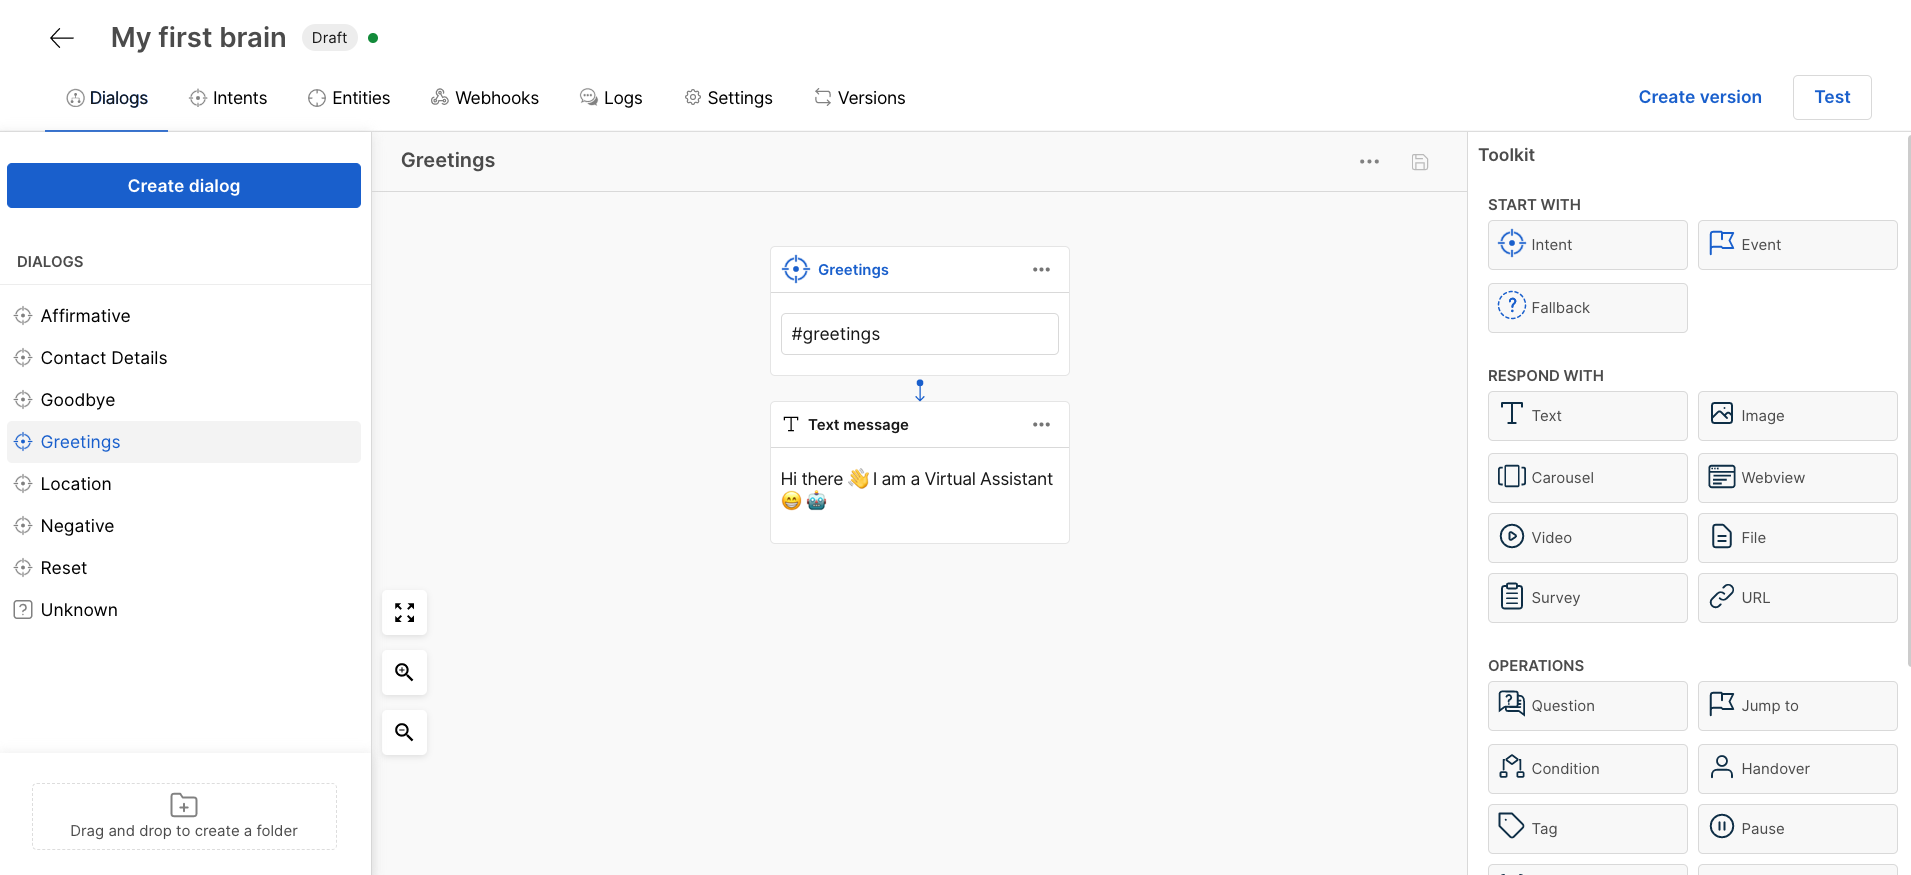
The virtual assistant can understand the two intents you have created, so you have to create the respective dialogs, in order to handle the intents. At first stage, start with two simple dialog nodes.
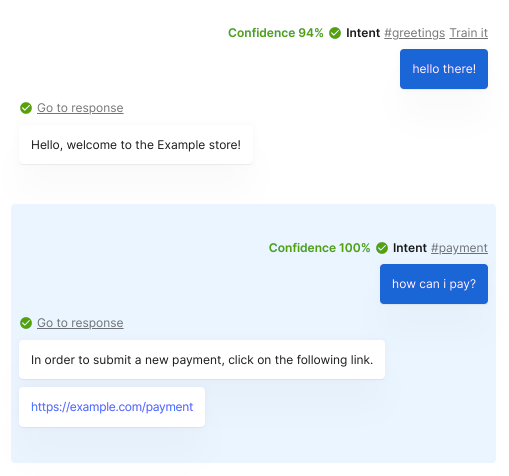
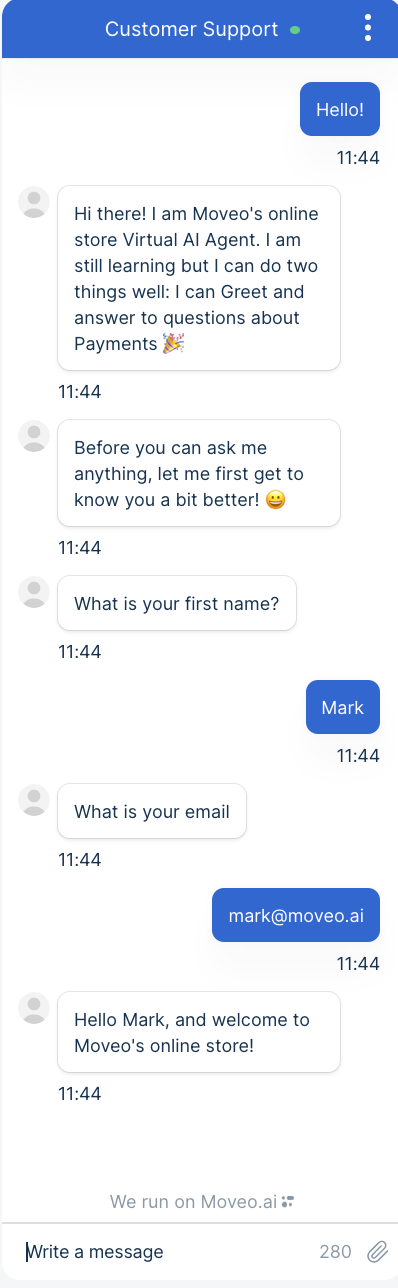
You can see that each dialog consists of an intent trigger connected to an intent and the appropriate responses. Remember that the brain activates an intent trigger, only when it classifies the user's text as of the corresponding intent. So, this brain would classify a message like Hello there! as of the #greetings intent, trigger the respective node and answer to the user. You can try the assistant out and check it works as intended.
- Greetings
- Payments
- Chat
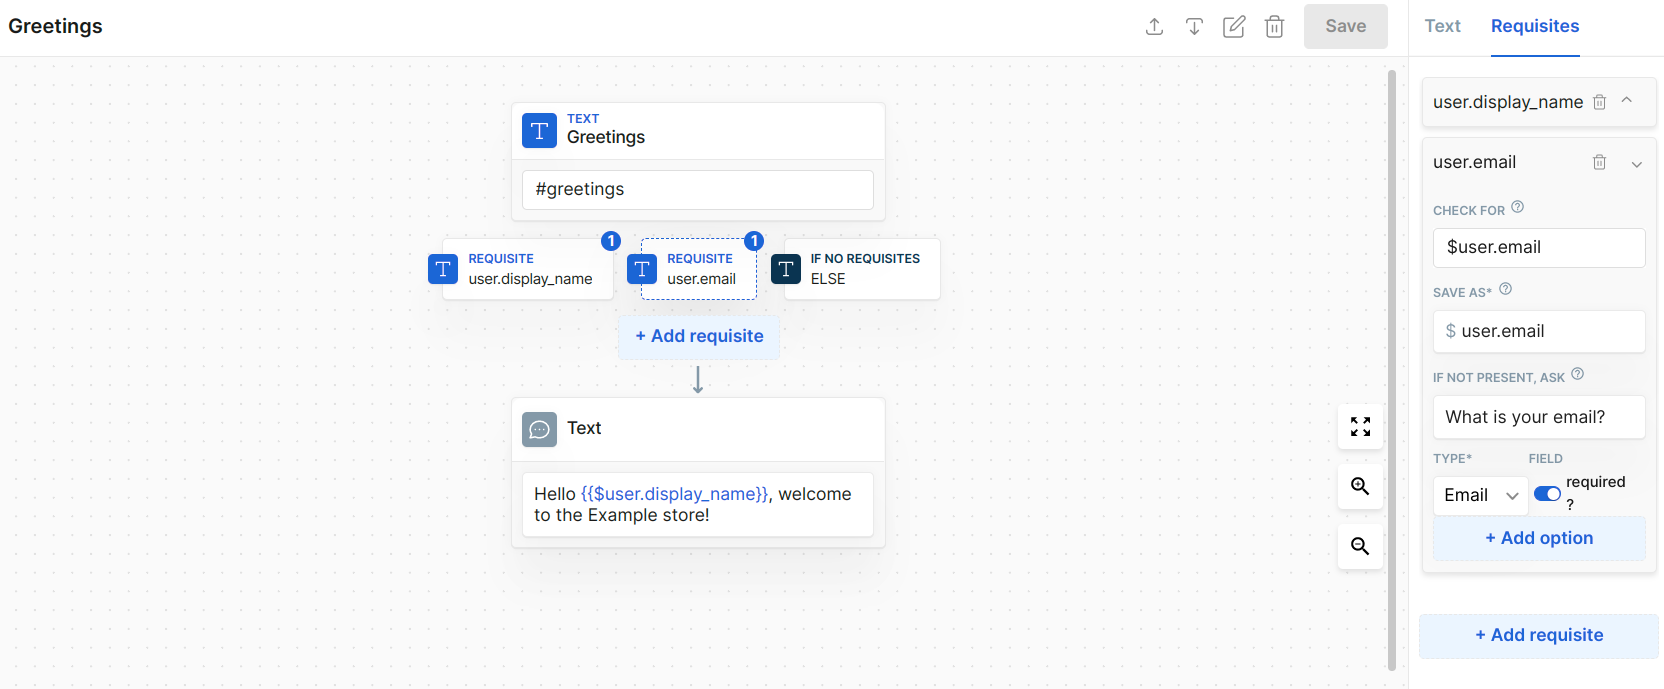
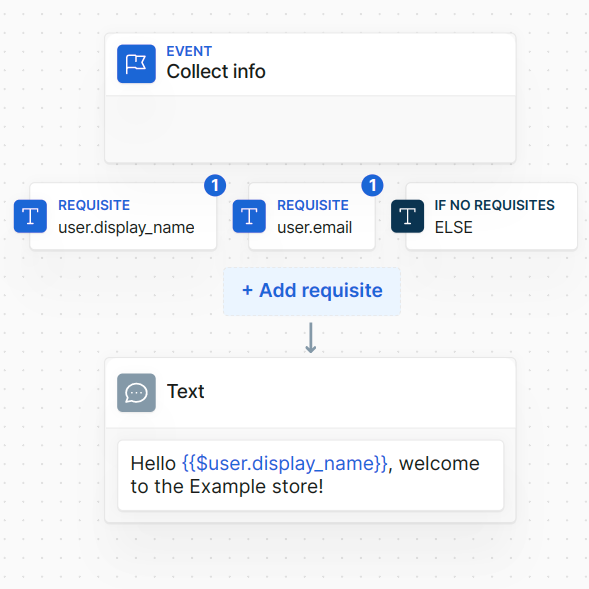
Requisites
So far you have provided a very simple and smooth interaction with the user. However, most stores would want to collect some information from the users, such as their first name and email. The most common way to extract information from the users is through requisites.
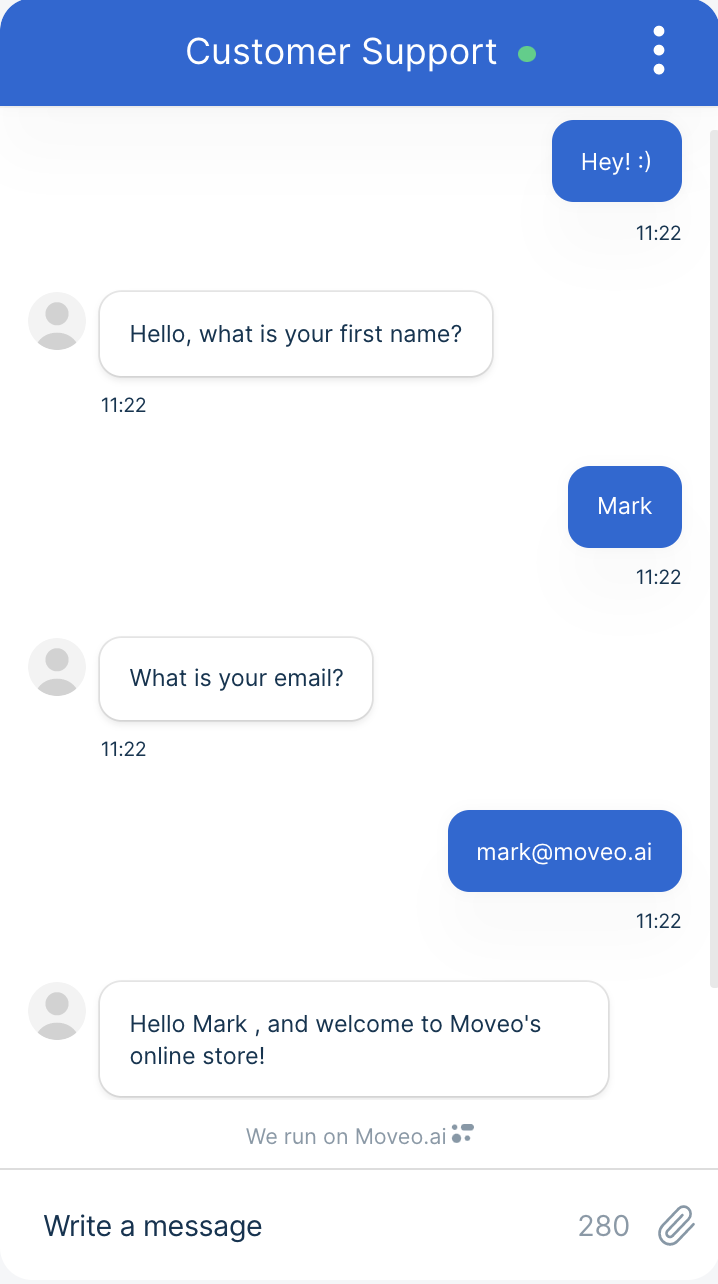
You can add two requisites in the #greetings node of the dialog, so the assistant asks for the users' first name and email. The assistant saves this information in the form of context variables. You can then refer to this information either in your responses, or with the use of a webhook.
In general, the brain temporarily stores context variables and can use them for the duration of the specific interaction with the user. If you need to permanently store data in your systems, the use of a webhook is recommended.
In the images below, you can see the use of the context variables regarding the user, $user.display_name and $user.email to store the user's first name and email respectively. You can also reference $user.display_name in your text response as {{$user.display_name}}.
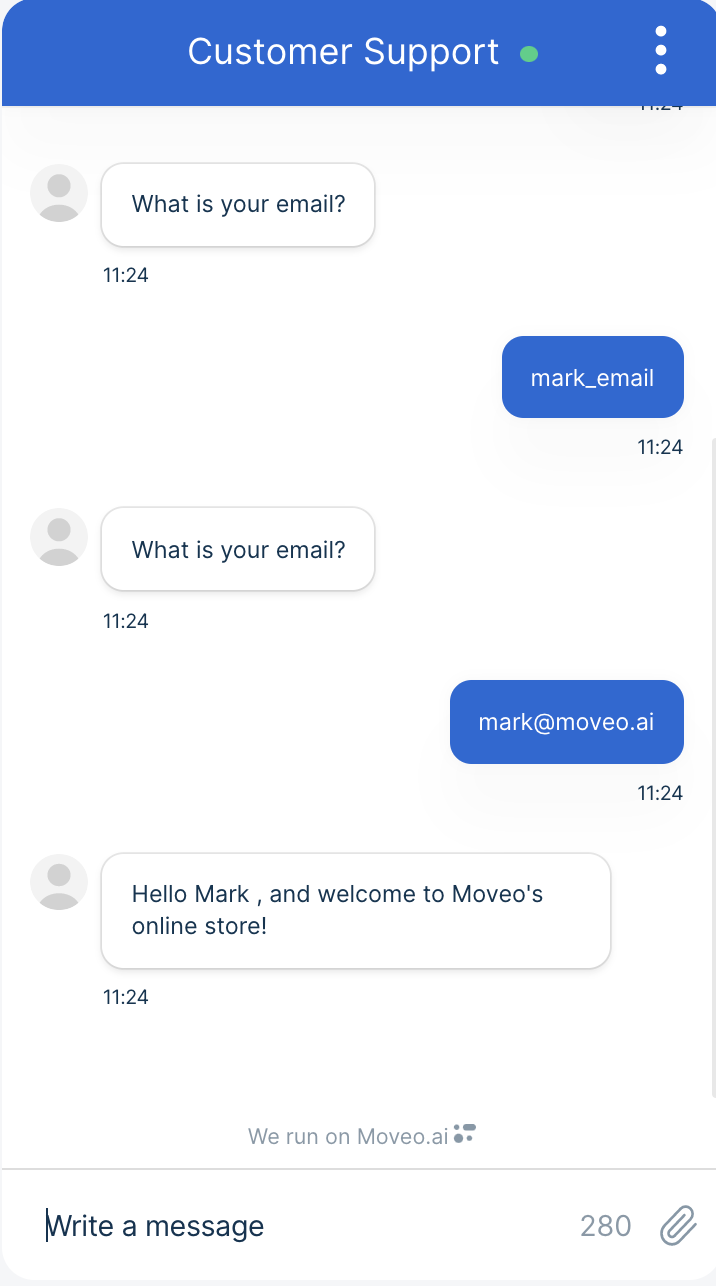
Also note that the type field of the email requisite is set to the predefined email, which validates if the user's message contains an email. For example, you can see below, that if the user makes a mistake when providing their email, the virtual assistant asks again.
- Requisites
- Chat success
- Chat mistake
Events
You may have the need to properly greet the users and give them a few details of how they can interact with the brain! Having the requisites in the initial greeting node does not give this capability. Event triggers allow you to break up the dialog into smaller parts that can be connected together by jump actions. In this case, you can properly greet the user in the initial greeting trigger node and after that, collect their first name and email. The dialog that collects the information consists of an event trigger with the same requisites as in the step above.
- Greetings
- Collect info
- Chat
Entities
Your virtual assistant can adequately greet the user and collect a few personal information, so you can improve it even more. You can construct a more complex experience with regards to submitting a new payment for your online store. More specifically, consider that the store can accept payments only by card or PayPal.
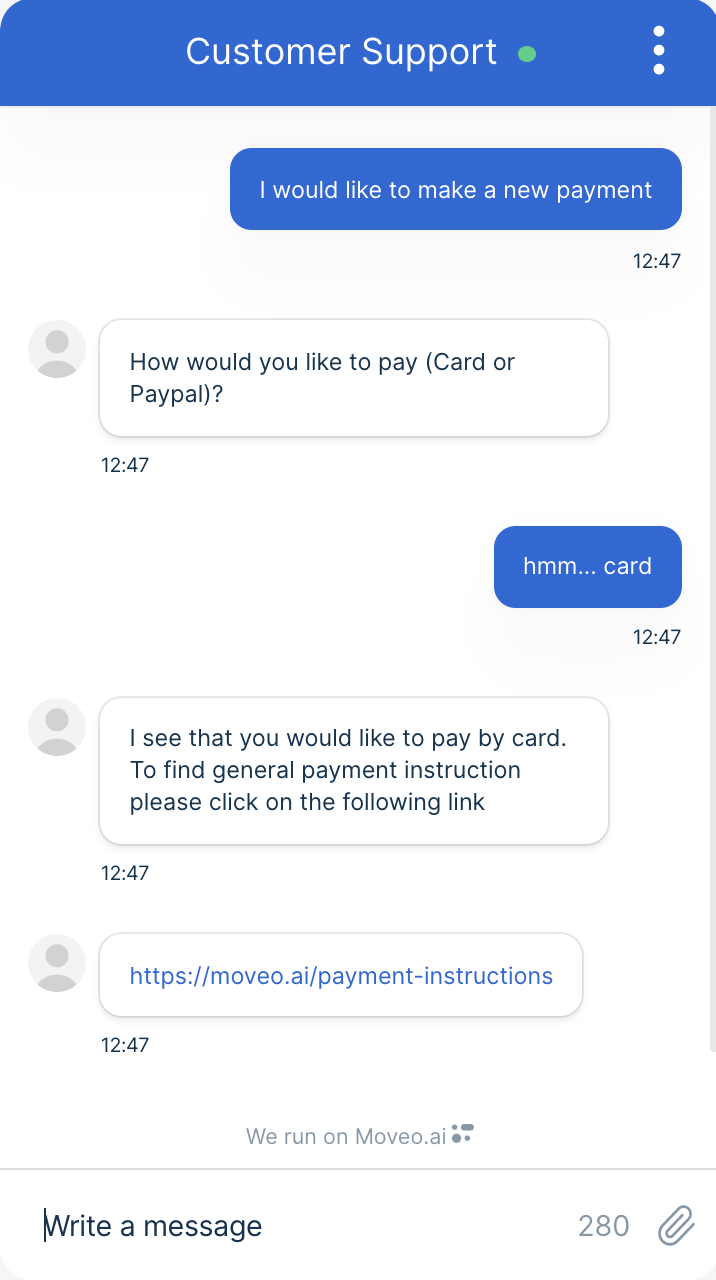
You might want to ask the users how they would like to pay if they have not previously mentioned it. For example, for a user's message 'I would like to make a payment' the virtual assistant should respond by asking 'How would you like to pay?'. However, for a user's message like 'I would like to pay with my credit card', the virtual assistant should redirect the user to the website that receives card payments.
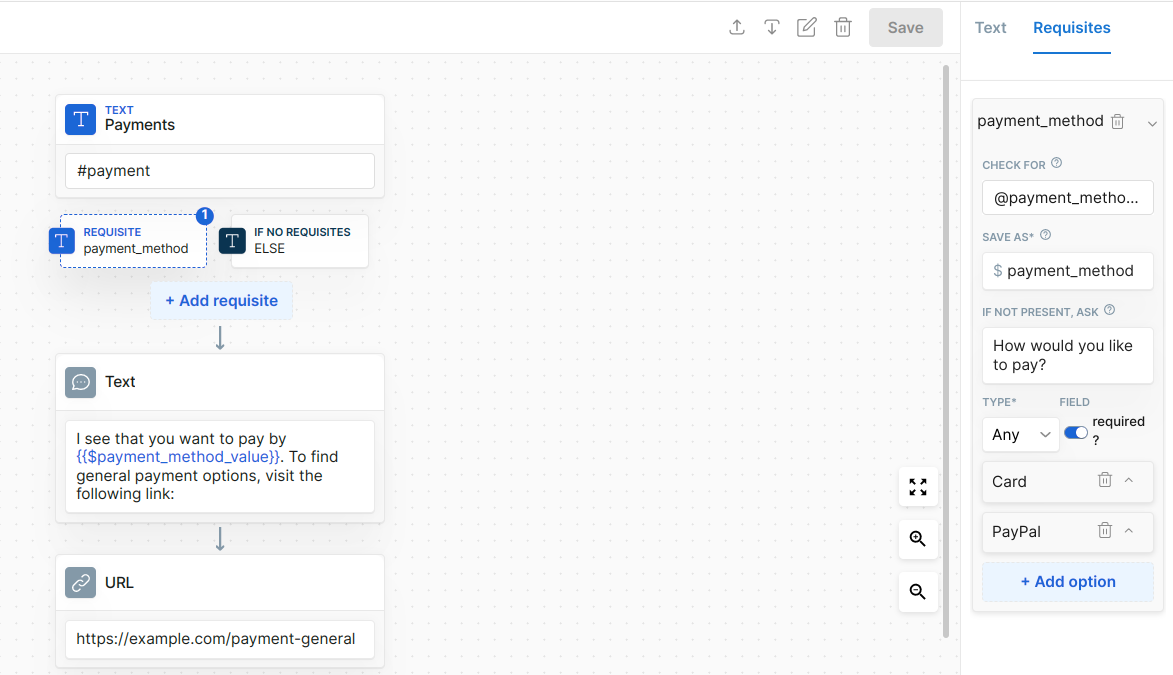
To do that, create a dialog, which understands if the user has specified a payment method and respond by referencing it.
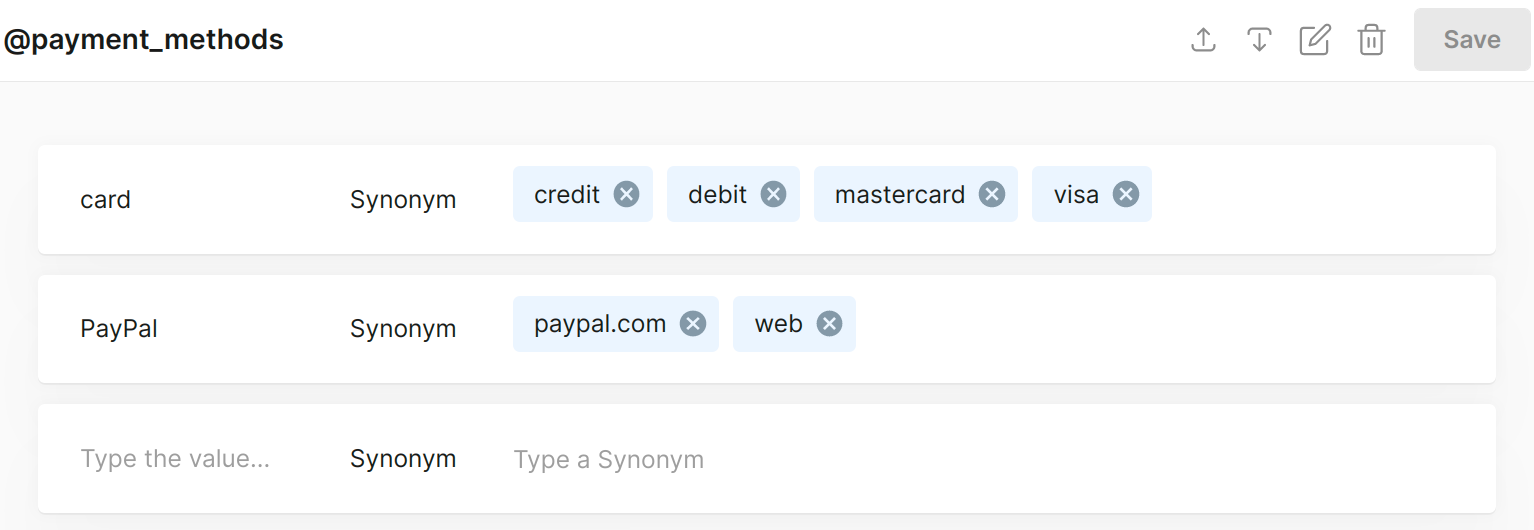
Begin by creating a @payment_methods entity, in which you should store the payment methods (card and PayPal) as values, and all the ways a user could refer to these values as synonyms.
To save the value of the payment methods in the context of the conversation, use the requisites functionality. The brain checks for the @payment_methods entity, and if it is present, saves the user input into a variable called $payment_method and the value into another variable, which has the value suffix, so $payment_method_value. If the brain does not recognize an entity, it asks the user the question you set in the respective field.
- Entity
- Context
- Dialog
- Chat without entity
- Chat with entity
User types: I want to pay with my mastercard.
| Variable | Value |
|---|---|
payment_method_value | card |

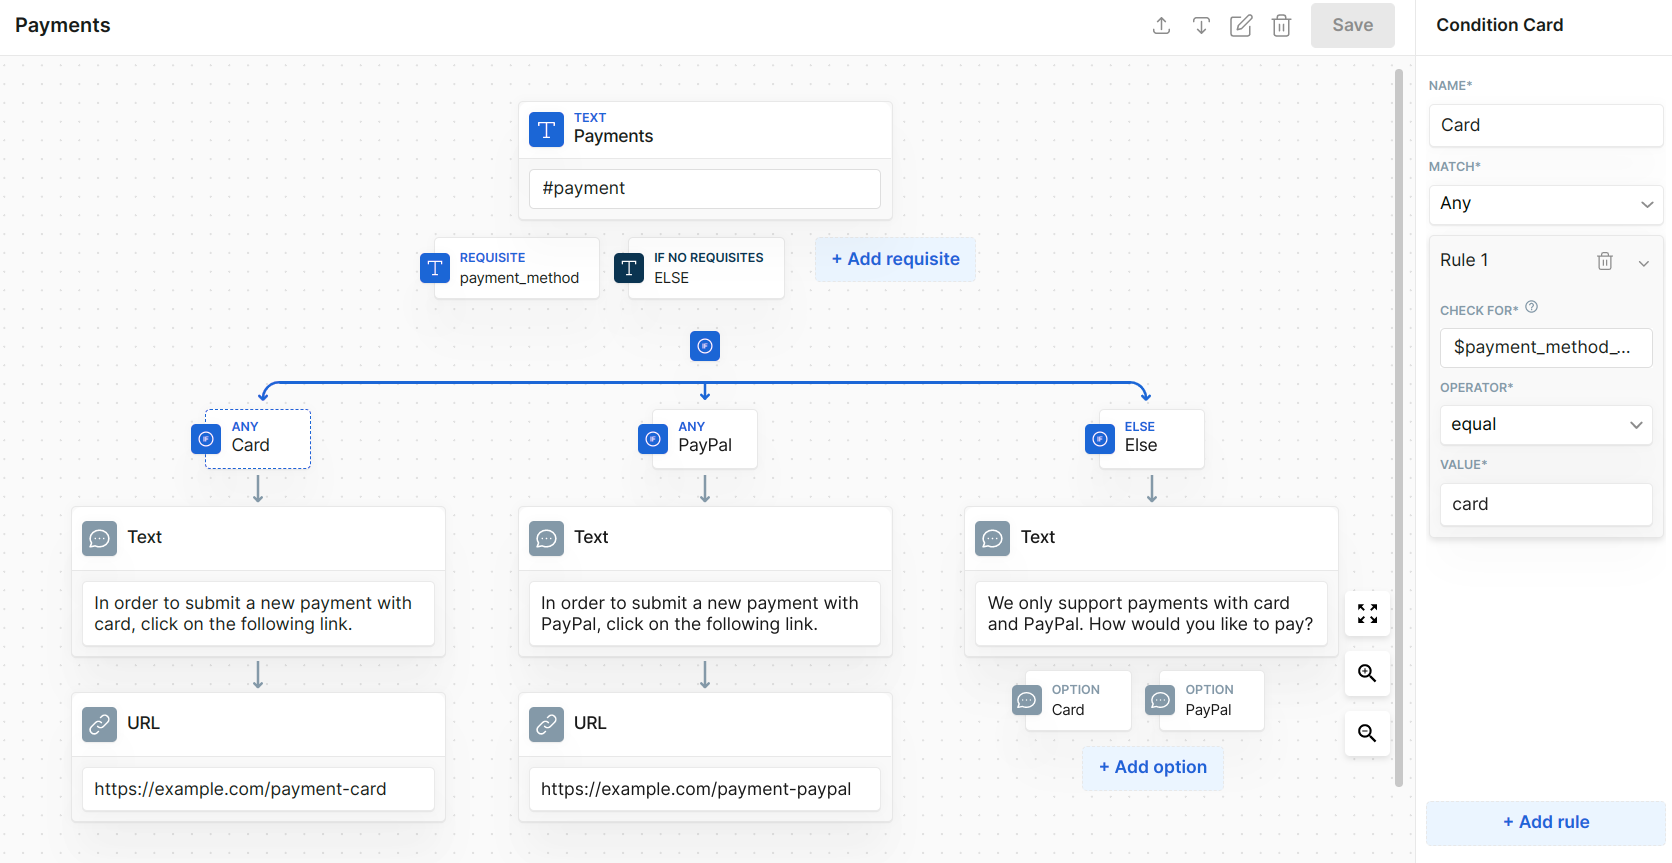
Conditions
In the above step, the response that the virtual assistant gives to the user is very generic. The virtual assistant does not take into advantage the fact that the user has specified their preferred payment method. One way you can take advantage of context variables is by adding conditions, which provide a different dialog flow depending on the previous steps in the conversation.
You can provide a different answer to the users, depending on their preferred payment method. With conditions, you can also make the requisite optional, and perform the following actions:
- Create one condition for each payment method, checking that the
$payment_method_valuevariable is equal to the method, and below the condition create the appropriate responses. - Create a general
elsecondition, that only activates if an entity is not present. You can also insert options below the response to navigate the users to the same intent, but a different branch/condition.
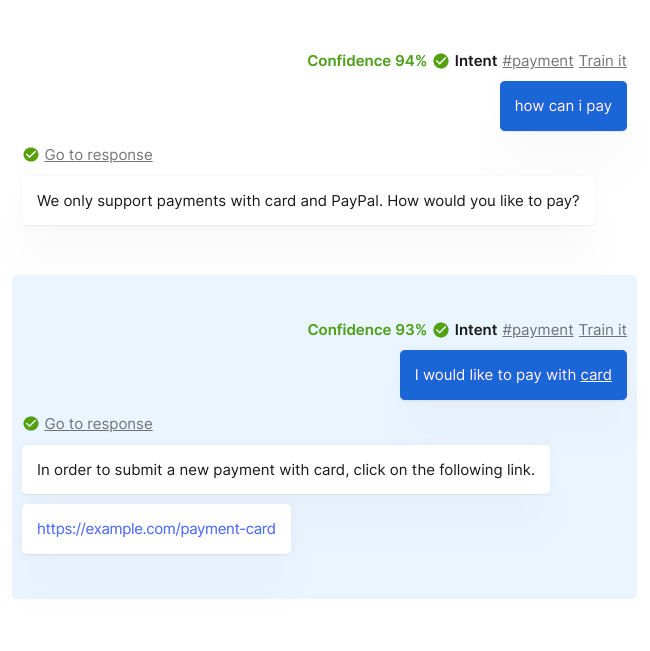
You can also check that your brain functions properly in Test.
- Condition
- Chat
- Unknown method