Zendesk Chat
Overview
Zendesk Chat integration enables your AI Agent to work seamlessly within your existing Zendesk support infrastructure. By connecting Moveo with Zendesk, you create an intelligent first line of support that can handle routine inquiries while smoothly escalating complex issues to your human agents.
This integration provides:
- Unified support experience with AI and human agents working together
- Automatic ticket creation for all customer conversations
- Tag-based routing to direct conversations to the right AI Agent or team
- Seamless handover between AI and human agents
- Complete conversation history maintained in Zendesk
Prerequisites
Before setting up the Zendesk integration, ensure you have:
✅ Zendesk requirements
- Zendesk Chat Enterprise version (required for API access)
- Administrator role in your Zendesk account
- Active Zendesk Support subscription
✅ Moveo account setup
- An active AI Agent configured
- An environment selected for the integration
✅ Technical requirements
- Authority to create API clients in Zendesk
- Access to Zendesk Chat settings and configuration
Zendesk Chat is an add-on to Zendesk Support. Both services must be active for the integration to work.
How it works
The Zendesk integration creates a bridge between your customers and your support team, with Moveo's AI Agent acting as an intelligent intermediary:
- Customer initiates chat through your Zendesk Web Widget
- Ticket is created automatically in Zendesk Support
- AI Agent engages based on tags and routing rules
- Conversation proceeds with AI handling routine inquiries
- Handover occurs when human assistance is needed
- History is preserved for seamless agent takeover
The integration operates through Zendesk's Web Widget Classic (chat mode), not the messaging widget or answer bot.
Setup guide
Step 1: Get info from Moveo
- Log in to your Moveo.AI account and click to Connect a new Zendesk integration.
- Note down the Client Name, Company, and Callback URL.
Step 2: Create Zendesk agent
- Go to your Zendesk Chat account.
- Create a new Agent and set the role to Administrator.
- This new Agent is the AI Agent, so give it a name that suits your business needs.
Step 3: Get the authorization details
- Log in to Zendesk Chat using the Agent you just created.
- Go to Settings → Account → API & SDKs → Add API client.
- Provide the Client Name, Company, and Callback URL you got from the info from Moveo.
- Click Create API client.
- Note down the Client ID and Client Secret.
- Note down the Subdomain of your Zendesk integration. You can find your domain by inspecting the
Zendesk URL. For example, if the URL of your Zendesk chat is
https://mycompany.zendesk.com/..., the subdomain ismycompany.
Step 4: Pass details to Moveo
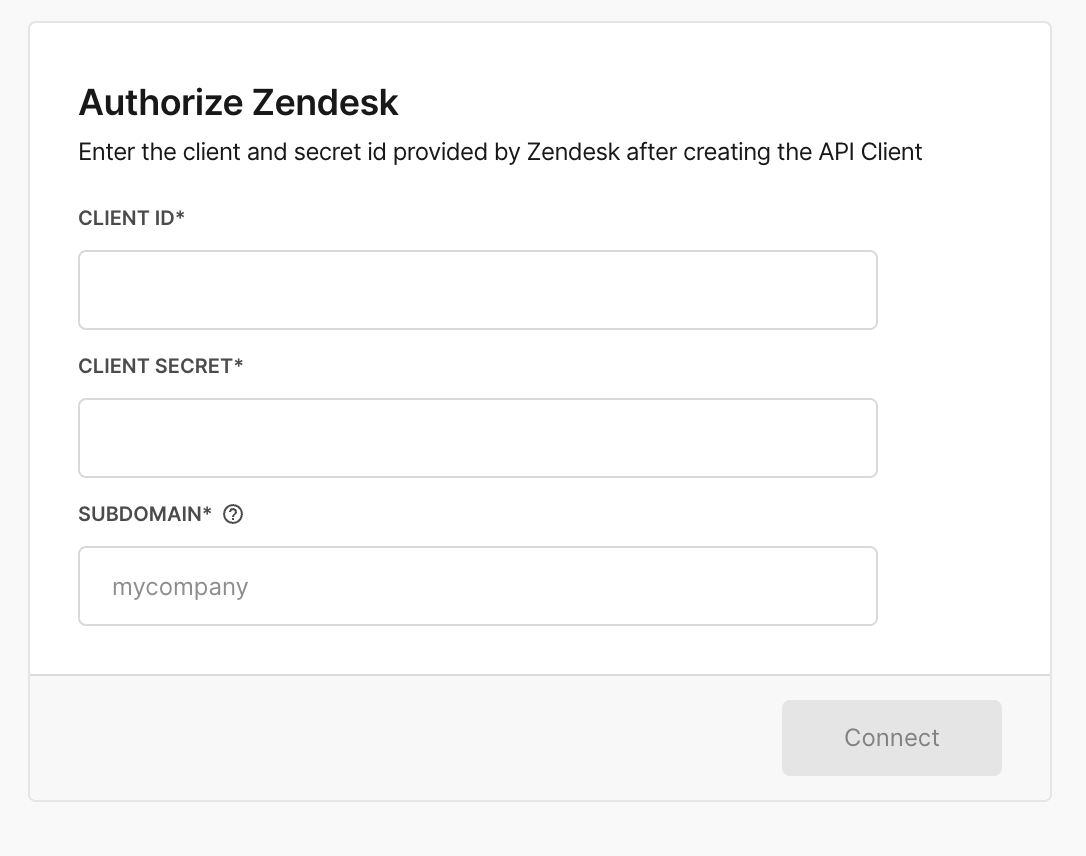
- Go back to the Moveo.AI Zendesk integration.
- Copy the Client ID, Client Secret, and Subdomain from the authorization details into the Authorize Zendesk section.
- Click connect and follow the authorization prompt.
Step 5: Activate and select tags
- After connecting your integration, set the status to active to start receiving messages.
- Optional: Select the tags you want the AI Agent to engage. If you select no tags, the assistant will respond to all messages.
Configuration options
Zendesk-side configuration
When integrating Moveo with Zendesk, it is important to note that Moveo's AI capabilities will operate through Zendesk's Web Widget Classic, where chat interactions take place. This is different from using Zendesk's native answer bot, which is considered messaging through the Web Widget.
This distinction is important because when the Zendesk answer bot is handling a conversation, no ticket has been created in Zendesk and no agents are engaged. However, when using Moveo's integration as an agent within Zendesk and through the API client established in chat, Moveo's AI capabilities will only be utilized when a ticket has already been created.
In order for the Zendesk chat to result in a conversation that includes one or more Moveo AI Agents and also creates a Zendesk ticket, you need to perform the following steps on the Zendesk side:
-
Go to Admin Center → Channels → Web Widget (Classic) and enable the Chat setting.
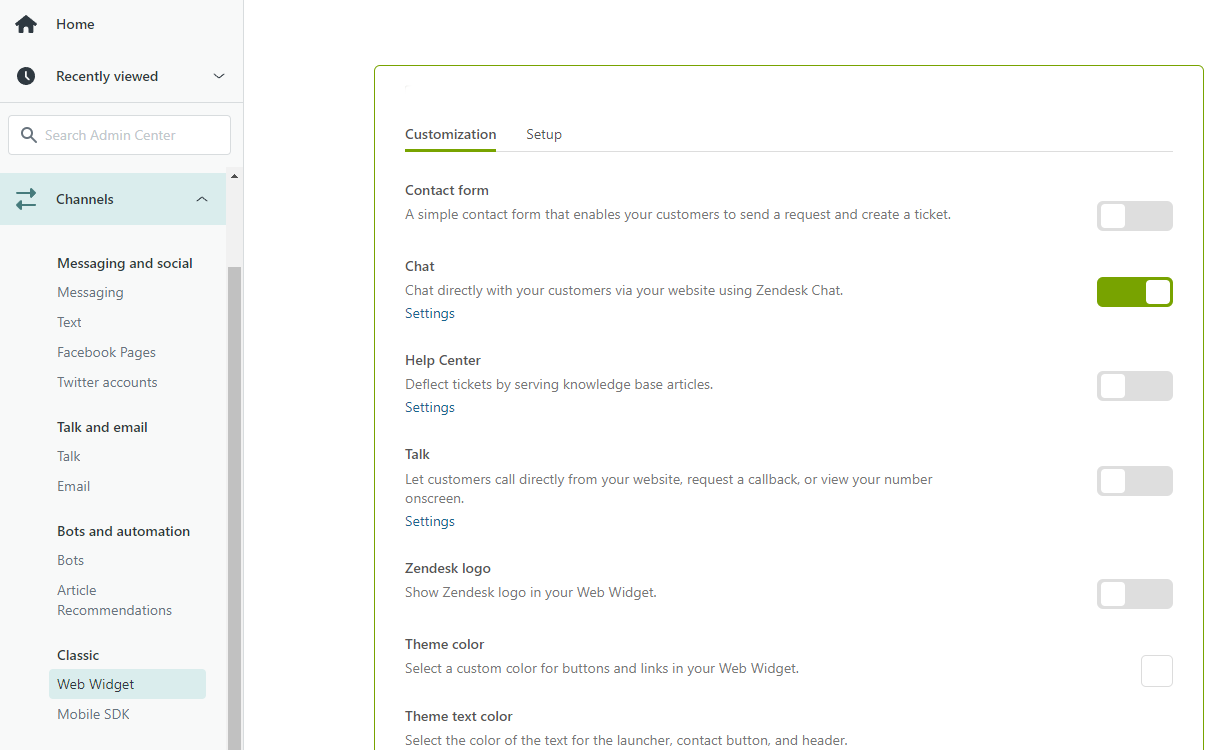
-
Go to Settings → Widget → Forms and turn on the Pre-chat form.
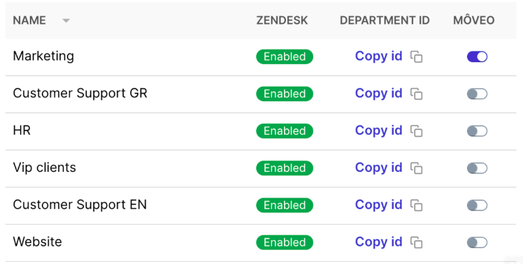
You can also require the user to select a specific department in the pre-chat form, where they will still have the option to go straight to a live agent if they choose a department that is not linked to Moveo. For example, if a user selects the Marketing department, Moveo handles the conversation. If they select the Customer Support EN department, the conversation goes to a live agent.
-
Always have at least one agent with Online status in Zendesk support. This agent can be either one of your live agents or Moveo.

Testing your integration
Test scenarios
-
Basic functionality
- Send a test message through the Web Widget
- Verify AI Agent responds appropriately
- Check ticket creation in Zendesk Support
-
Tag-based routing
- Test messages with different department selections
- Verify correct AI Agent engagement
- Confirm tag application
-
Handover process
- Trigger a handover scenario
- Verify smooth transition to human agent
- Check conversation history preservation
Monitoring
- Agent status: Ensure at least one agent is online
- Widget visibility: Confirm chat widget appears correctly
- Response times: Monitor AI Agent response speed
- Ticket creation: Verify all conversations create tickets
Common use cases
Tier 1 support automation
- Handle password resets and account questions
- Provide product information and pricing
- Process simple troubleshooting steps
- Collect initial information for escalation
Department-based routing
- Marketing inquiries to specialized AI Agent
- Technical support to troubleshooting flows
- Sales questions to lead qualification
- Billing issues to payment assistance
After-hours coverage
- 24/7 AI Agent availability
- Ticket creation for morning follow-up
- Emergency escalation protocols
- FAQ handling during off-hours
Best practices
Widget configuration
- Enable pre-chat forms for better routing
- Set clear department options
- Configure operating hours correctly
- Customize widget appearance to match brand
AI Agent setup
- Train on your Zendesk knowledge base
- Configure appropriate handover triggers
- Set clear escalation criteria
- Use tags effectively for routing
Team coordination
- Keep at least one agent online status
- Define clear handover procedures
- Document AI Agent capabilities for team
- Regular review of AI-handled tickets
Troubleshooting
Handover not working
Handover might fail if triggered immediately when dialog starts:
- Insert a pause response before handover
- Ensure proper agent availability
- Check department configuration
- Verify routing rules
AI Agent not responding
- Verify integration is set to Active in Moveo
- Check API client credentials are correct
- Ensure at least one agent has Online status
- Confirm Web Widget Classic is enabled (not messaging)
Tickets not being created
- Verify Zendesk Support is active
- Check Web Widget configuration
- Ensure pre-chat form is enabled
- Review ticket creation rules
Wrong AI Agent engaging
- Review tag selection in Moveo integration
- Check department routing rules
- Verify AI Agent assignment to correct tags
- Test with different department selections
Limitations
Platform requirements
- Enterprise only: Zendesk Chat Enterprise required for API access
- Widget type: Only works with Web Widget Classic (chat mode)
- Ticket requirement: AI Agent only engages after ticket creation
- Online status: Requires at least one online agent
Integration constraints
- Cannot use Zendesk's native answer bot simultaneously
- Pre-chat form recommended for proper routing
- Limited to chat interactions (not messaging)
- Tag-based routing only
Resources
Documentation
Support
- Zendesk Support Center
- Moveo support: support@moveo.ai
Next steps
Once your Zendesk integration is active:
- Configure departments for proper routing
- Train your AI Agent on common support scenarios
- Set up tags for different conversation types
- Test thoroughly before full deployment
- Monitor performance and optimize responses