Set up Authentication
This page walks through the Authentication action in the dialog builder, panel by panel. By the end you will have a working two-step auth flow that runs at the start of every conversation on a test AI Agent.
For a worked end-to-end example showing how scoring, guidelines, and webhooks fit together, see the CRM-backed two-step recipe.
1. Add the Authentication action to a node
Open a dialog in your AI Agent (Workflows → Dialogs). In the Toolkit on the right, find the subagents group and drag Authentication into the node where you want the auth flow to run.
Where you place it is when it runs: the flow starts when the conversation reaches that node. To run it at the start of every session — the most common setup — see step 9.
2. The action card at a glance
The action card shows the whole auth flow inline: the Identify the user and Verify the user steps, each with its success and failure outcomes. Click any part of the card to open its configuration panel on the right. The rest of this walkthrough goes panel by panel.
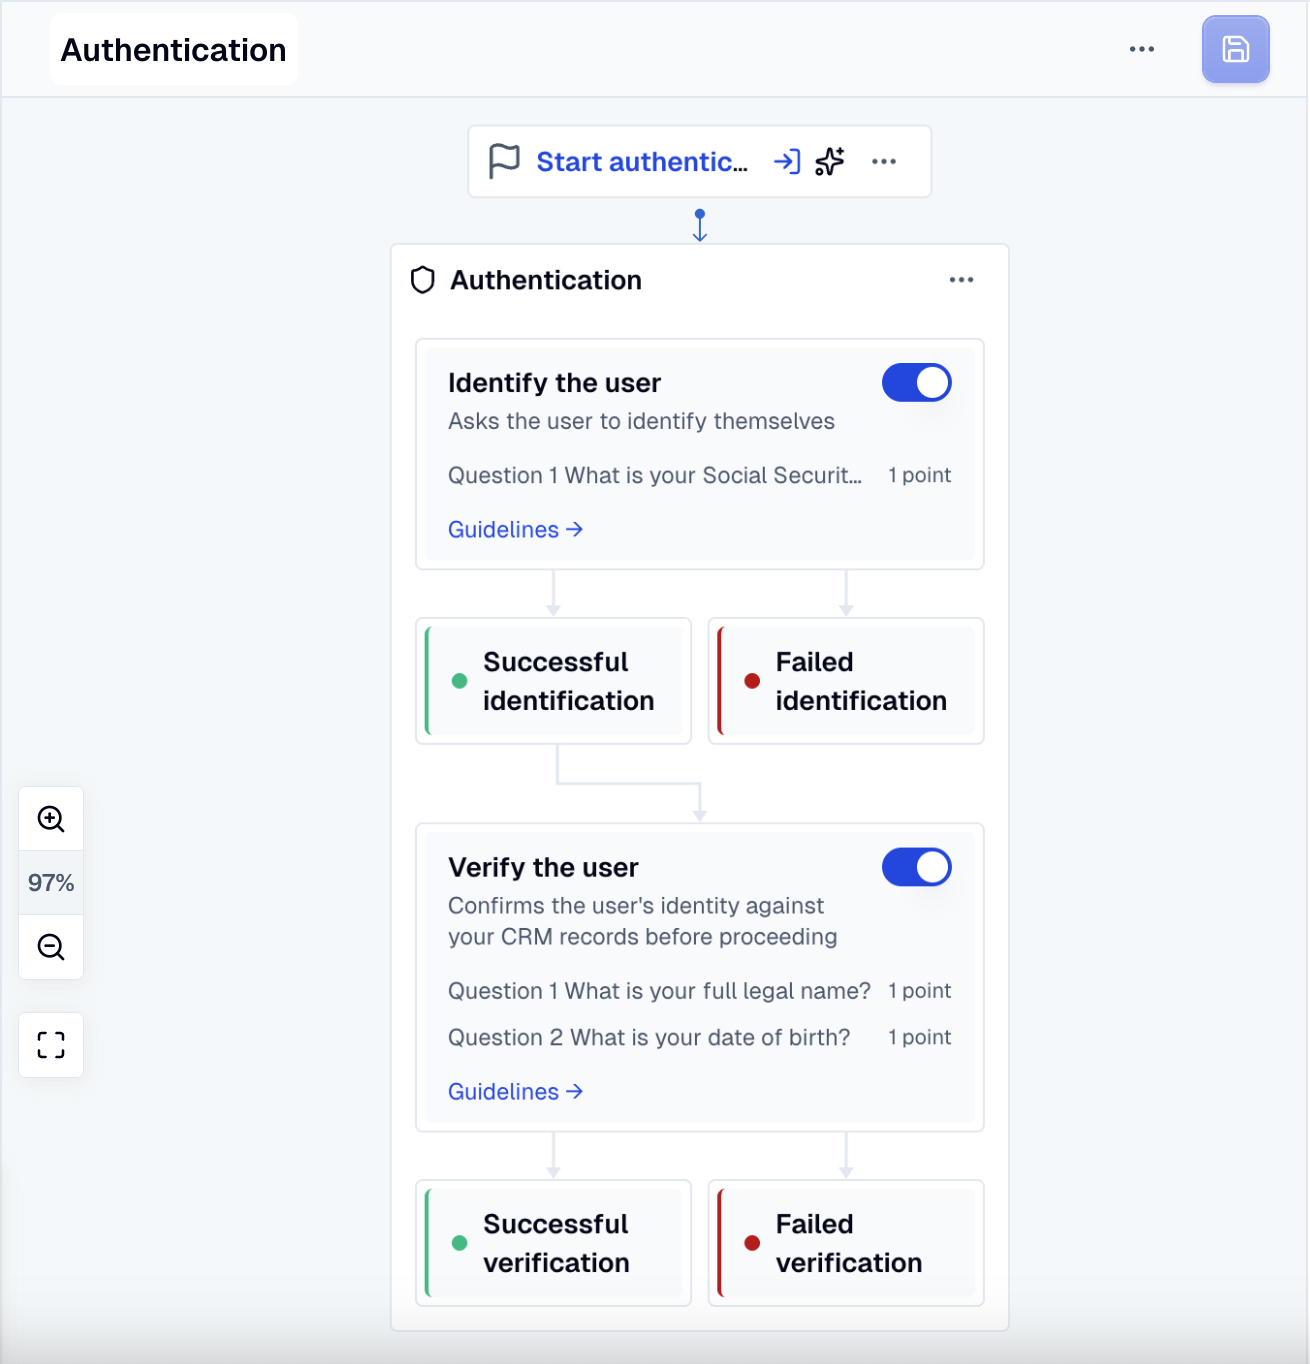
3. Enable the identification step
The identification step asks the user to claim an identity ("what is your account number?"). It's the natural starting point for inbound conversations, where you don't yet know who's on the line. For outbound conversations — where the agent proactively reached out to a known customer — skip identification and use only verification (step 7). For more on the distinction see the mental model.
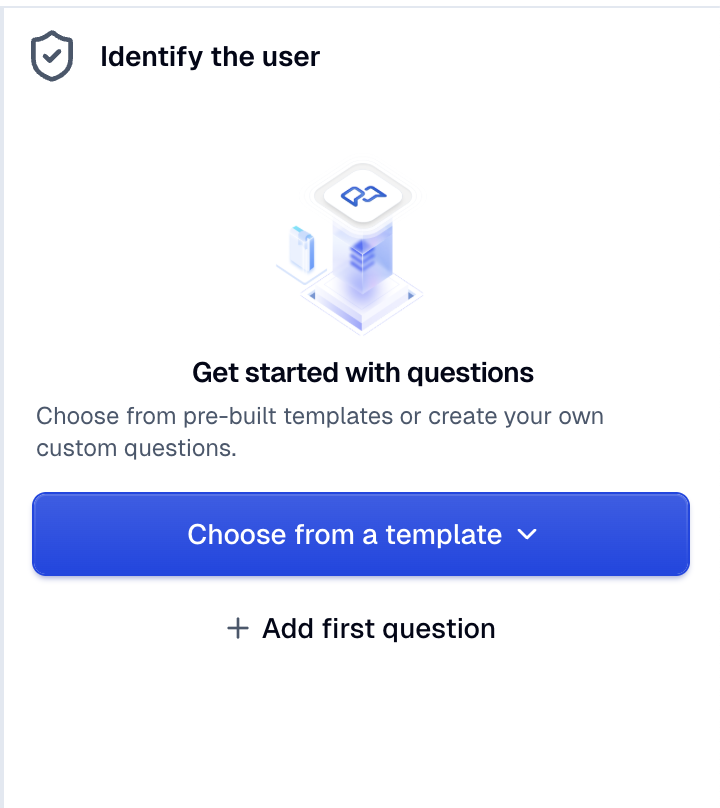
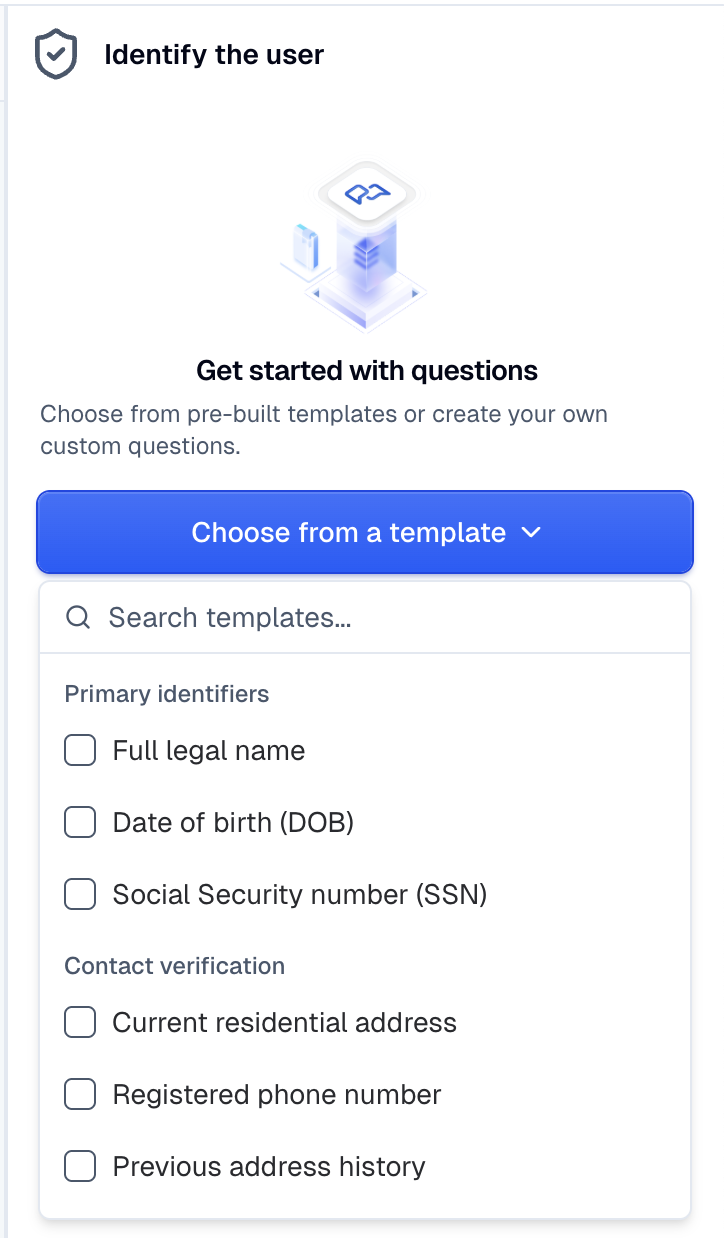
Toggle the Identify the user card on. Its panel opens with an empty state and two ways to add questions:
- Choose from a template — pre-built questions from three categories (Primary identifiers, Contact verification, Account & Transactional KBA).
- Add first question — start from scratch.
4. Configure a question
Each question expands into a form with up to seven fields. Some fields are conditional on the validation method.
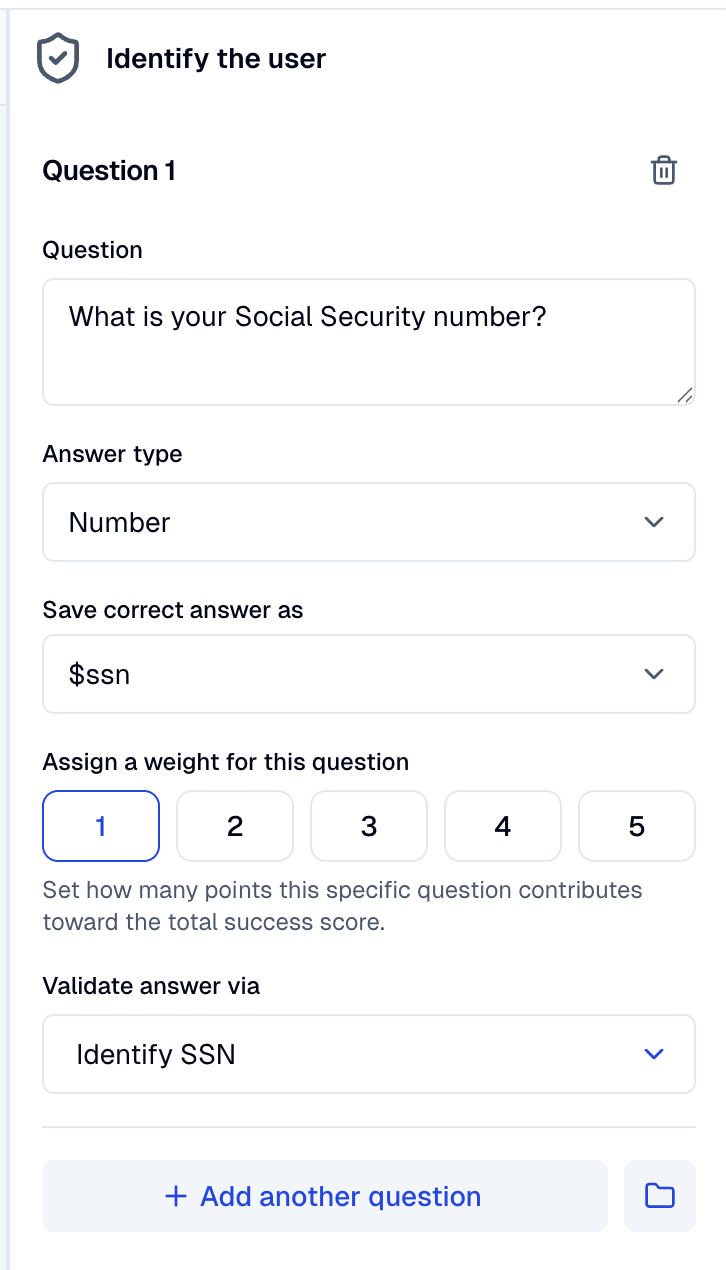
| Field | Purpose |
|---|---|
| Question | The text the agent will ask the user. Required, max 256 chars. |
| Answer type | One of Text, Date, Integer, Number, Phone, Alphanumeric. Affects how the agent extracts the value. |
| Save correct answer as | The context variable to store the accepted answer in (e.g. $ssn). Must start with a letter or underscore. |
| Assign a weight for this question | 1–5 points. Defaults to 1. See Scoring. |
| Validate answer via | How to check the answer. Three subgroups: Operator, Guideline, Webhook. |
| Ground truth (conditional) | The variable holding the right answer (for Exact match, Fuzzy match, Contains, Starts with, Ends with). |
| Fuzzy match threshold (conditional) | 0–100 similarity score. Defaults to 90. |
| Validation guideline (conditional) | Free-text rule shown only when Validate answer via is set to Guideline. |
Validation methods
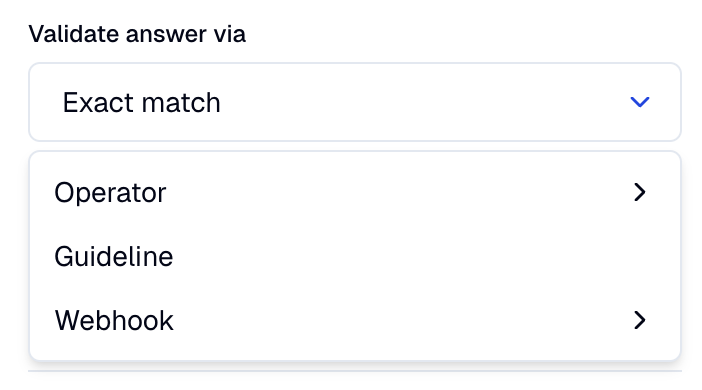
- Operator — server-side string comparison against a context variable:
Exact match,Fuzzy match,Contains,Starts with,Ends with. - Guideline — a free-text instruction that's used to judge the answer (e.g. "Accept if the user gives any valid US ZIP code.").
- Webhook — calls a webhook of type
auth_validationconfigured on this AI Agent. Only validation-typed webhooks are listed in the dropdown. See Webhooks.
Max ten questions per step
The Add another question button is disabled at ten questions per step. If you need more degrees of identification, split the work across the identification and verification steps.
5. Score threshold (success panel)
Click the Successful identification box on the action card to open the success panel.
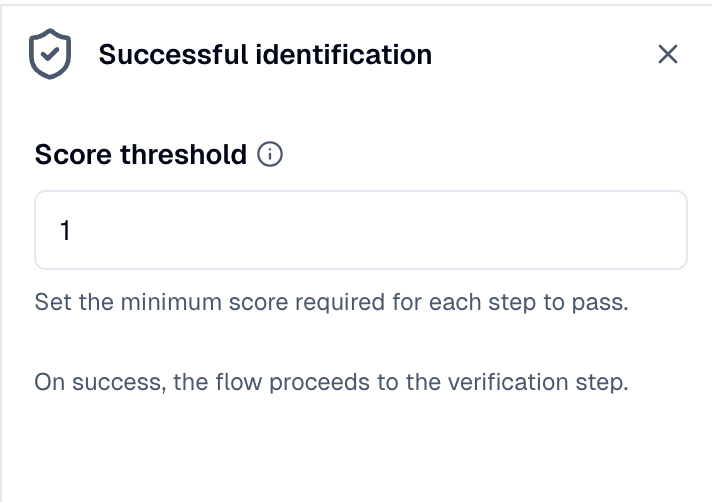
The Score threshold is the minimum total points needed for the step to pass:
The minimum total points from correct answers needed to pass this step.
If your questions sum to 4 points and you set the threshold to 5, you'll see a warning: "Threshold exceeds the total available points." — the step would never be able to pass. Adjust either the question weights or the threshold.
Threshold and weights together give you alternative-scenario design. See Scoring.
6. Failure conditions
Click the Failed identification box to open the failure panel.
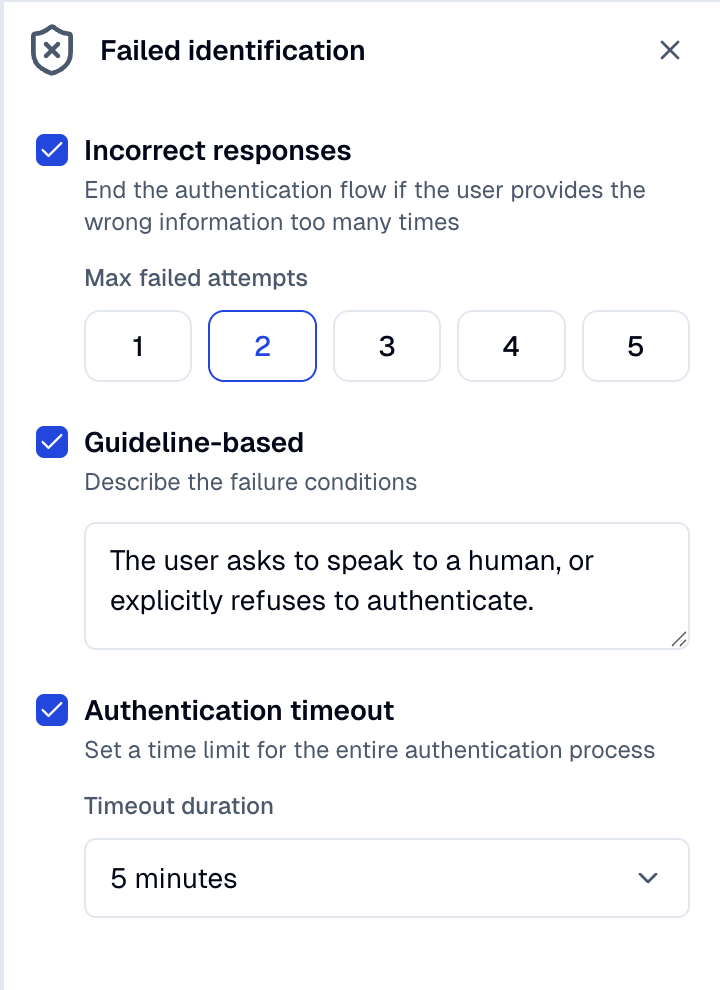
Three independent failure conditions:
- Incorrect responses — "End the authentication flow if the user provides the wrong information too many times." Defaults to 3 attempts when enabled.
- Guideline-based — "Describe the failure conditions" in free text. The agent will exit the step with failure if the condition is met (e.g. "The user asks to speak to a human."). See Guidelines as exit conditions.
- Authentication timeout — caps the wall-clock time the user has to complete the step. Defaults to 5 minutes; options are 1, 3, 5, 10, 15, 30, or 60 minutes.
Any one of the three firing routes the conversation to the failure node.
7. Enable the verification step (optional)
The verification step asks the user to prove an identity you already think you know — either because identification just resolved them against a record, or because the conversation is outbound and you contacted a specific customer.
It has the same shape as identification, with one extra control at the top: a Pre-enter webhook dropdown.
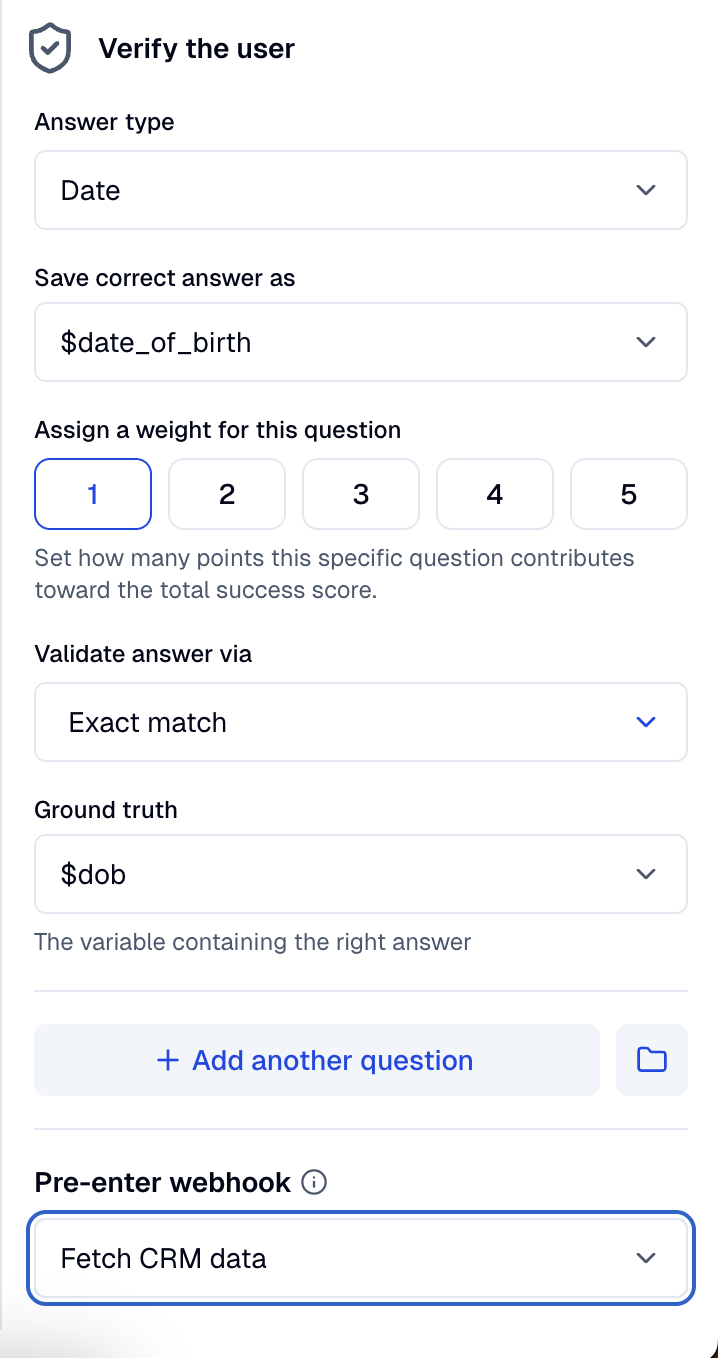
The tooltip explains it:
Runs just before the verification step starts. Use this to fetch the ground truth data needed to validate the user's answers.
A common pattern: identification asks for an SSN, validated via webhook against your CRM; once identification passes, the pre-enter webhook fetches the matching name and date of birth into the conversation context; verification then asks for those and validates them with Exact match / Fuzzy match against the freshly populated context variables.
The pre-enter webhook only exists on the verification step. The dropdown only lists webhooks of type auth_pre_enter — create one in Workflows → Webhooks under the Authentication webhooks group. See Webhooks.
8. Trigger node on success / failure
On the last enabled step (identification if you didn't enable verification; otherwise verification), the success and failure panels each include a node selector.
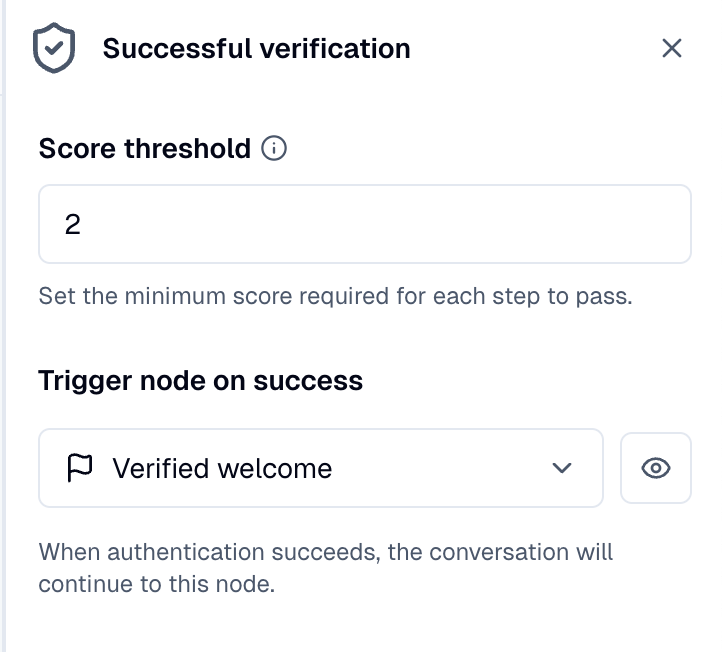
- Trigger node on success — "When authentication succeeds, the conversation will continue to this node."
- Trigger node on failure — "When authentication fails, the conversation will continue to this node."
Both fields autocomplete against the dialog nodes in your AI Agent.
Common patterns:
- Success → a dialog node that greets the now-verified user by name and proceeds with the actual task.
- Failure → a handover node that escalates to a human, or a graceful-decline dialog.
9. Run it at the start of the conversation
Most use cases need authentication to be the very first thing in the session. In the AI Agent's Settings, set When a conversation starts, trigger: to the node containing your Authentication action.
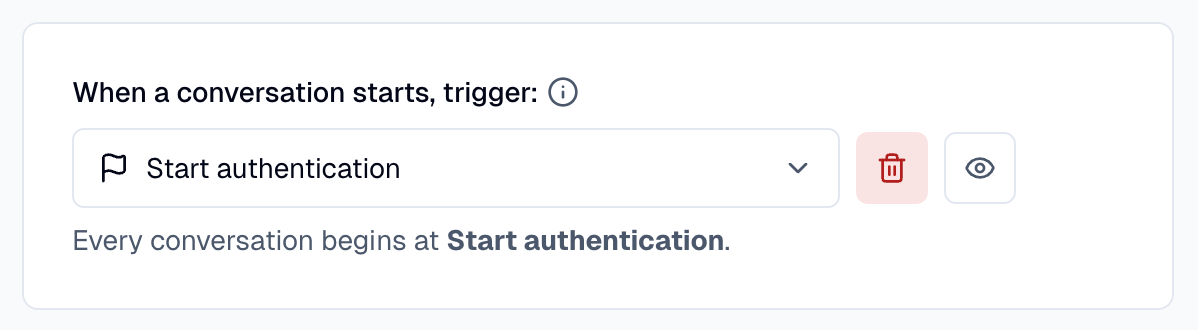
Every conversation now opens with the auth flow — the Authentication Agent generates the first message itself, shaped by your step guideline (step 10).
10. Guidelines
Below each step's question list there's a small Guidelines link. Click it to open the guidelines drawer.
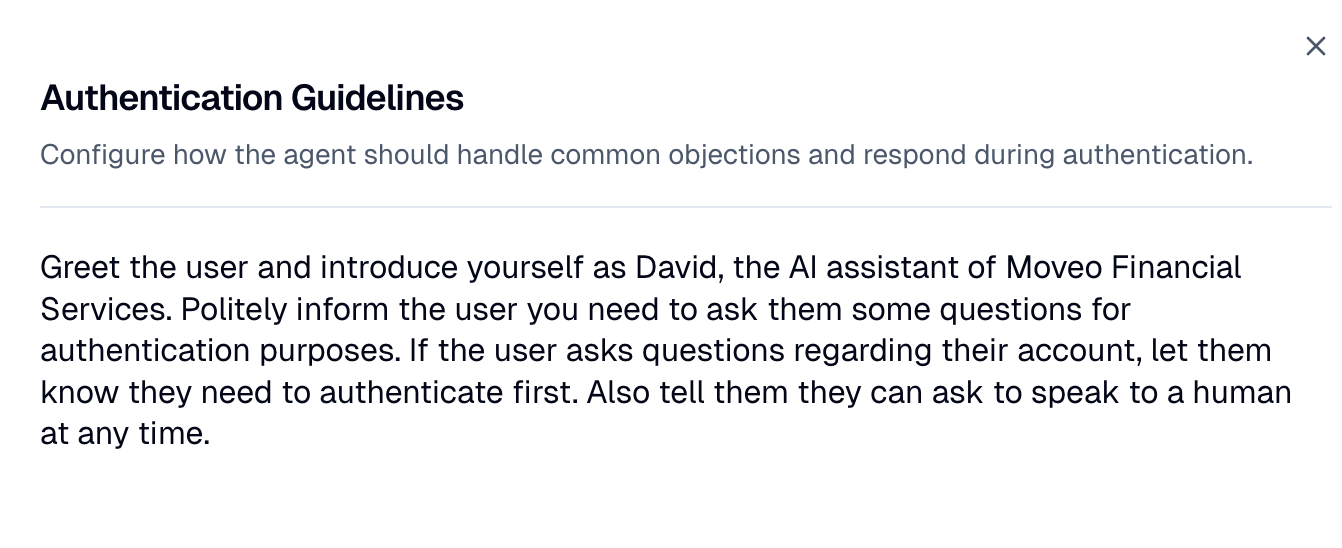
The drawer header reads Authentication Guidelines, with the description:
Configure how the agent should handle common objections and respond during authentication.
The editor supports:
/for commands (lists, headings, etc.)- The dollar prefix (e.g.
$user.name) for context variables
This is where you script the greeting, define alternative scenarios in natural language, and tell the agent how to handle common objections. See Guidelines.
11. Test in Try It
Open the Try It panel and start a conversation. While auth is running, an Authentication card appears in the panel showing the current step, status, score, attempts, and the list of variables successfully extracted.
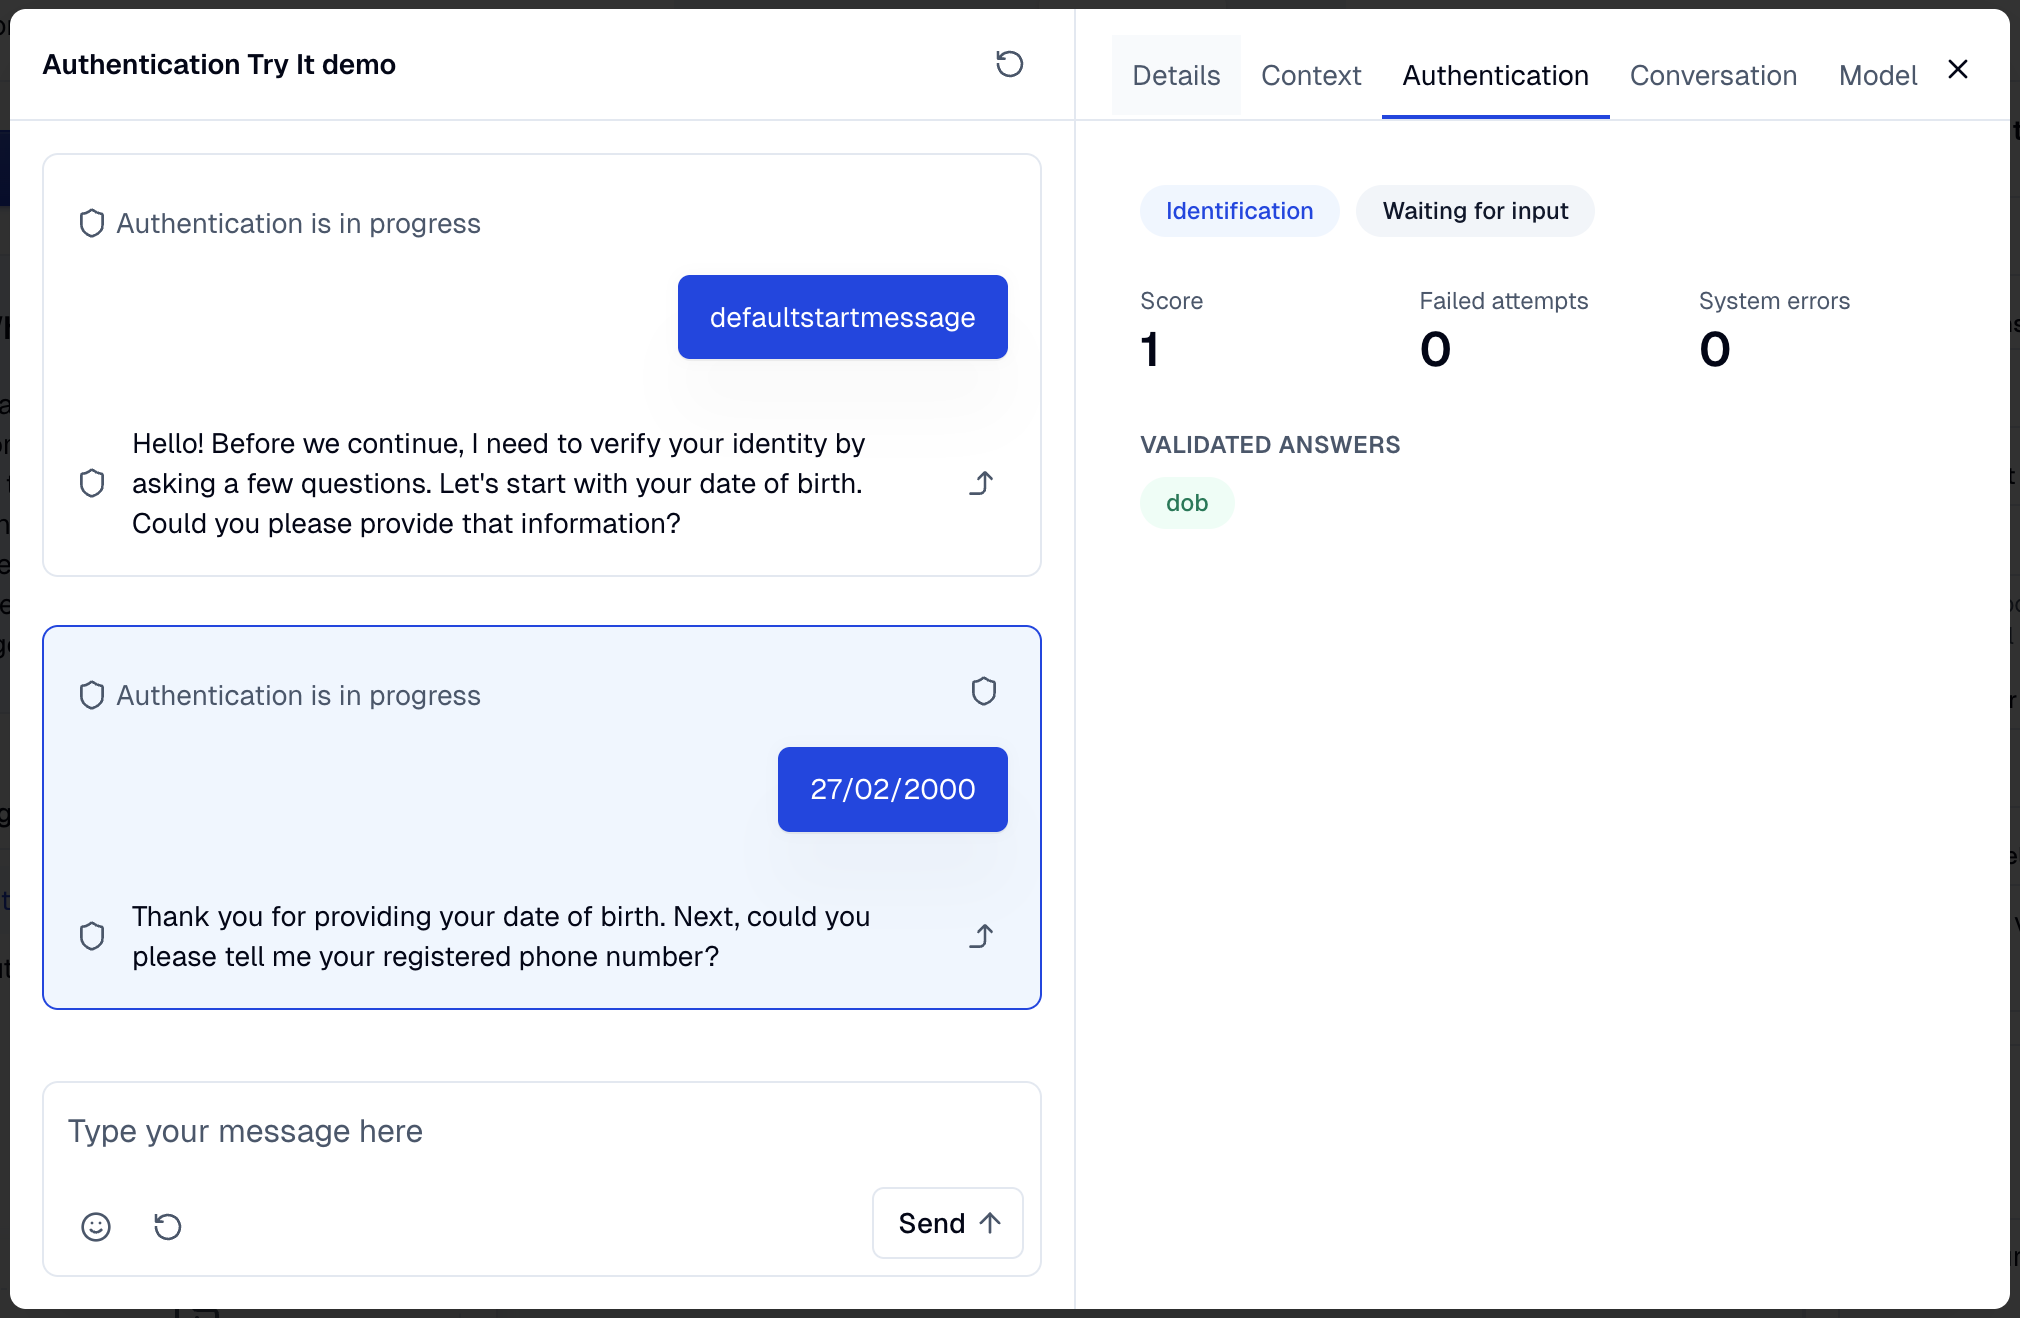
You can deep-link from the Try It panel back to a specific question in the configuration to inspect or fix it.