Webviews
Templates
- If you want to jump straight into some template code, go to our integration-guides repository on GitHub.
- You can test a template AI Agent that uses a form webview.
How to create your own webview
When the Webview response node is triggered, and the customer presses the Open Form button, Moveo calls your webview URL and appends the necessary query parameters.
For example, the URL https://webviews.moveo.ai/Company/webview-name would be called like:
https://webviews.moveo.ai/Company/webview-name?channel=facebook&integration_id=1a234567-b8cd-9e0f-1234-g5h6ij78klmn&page_id=1234567890123456&session_id=ab1c23d4-5ef6-7gh8-i9hj-k0lm12345n6o&trigger_node_id=123456a7-bc89-01d2-345e-67f89g012h34&user_id=1234567890123456
Ensuring the origin of the webview request
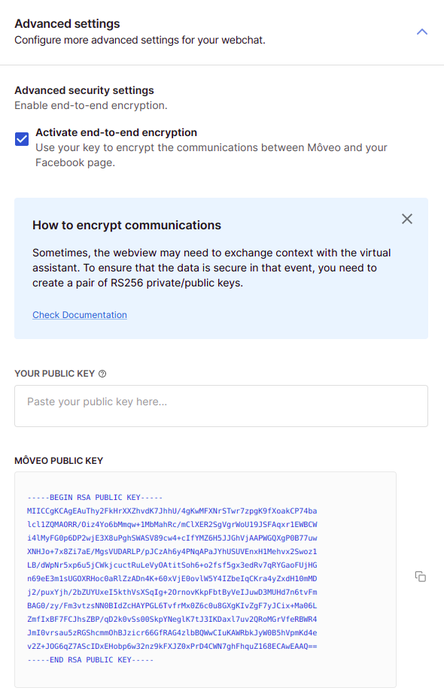
In some cases, the webview may need to exchange context with the AI Agent. To ensure that the data is secure in that event, create a pair of RS256 private and public keys by executing the following commands:
openssl genrsa -out private.pem 2048
openssl rsa -in private.pem -outform PEM -pubout -out public.pem
Add the public key to your integration (example for Facebook):
-
Go to the Integrations tab of your account.
-
Select your environment and integration.
-
Add the public key in the YOUR PUBLIC KEY field of the integration.
Creating the webview
Here is a step-by-step example of creating a webview that uses a form to collect data from the user and sends it back to Moveo.
-
Get the following query parameters from the URL:
Parameter Required Description integration_id✔️ The ID of the integration that triggered the webview session_id✔️ The ID of the current conversation session user_id✔️ The user's unique ID in Moveo channel✔️ The integration channel (e.g. web,facebook,viber)trigger_node_id➖ The ID of the node that triggered the webview response page_id➖ The Facebook page ID (Facebook Messenger only) lang➖ The language code of the AI Agent, if set tipThe
user_idis also available in the payload of any Moveo webhook call to your backend — it is included undercontext.user.user_idin event webhooks and can be passed explicitly as a context variable in dialog webhooks. This is useful if your webview is opened from a flow where a webhook has already run and you want to correlate the two requests server-side. -
Collect data using a form or in any other way you wish.
-
Prepare the request body:
data = {
  trigger_node_id, // required, UUID of the trigger node
  context: {
    // optional, any context variables you want to pass back to the AI Agent.
    ...contextFromForm,
  },
};
The context field is merged into the conversation's context object and the variables
become available to the flow. See Context and variables for details on how
context works and what system variables are already available.
- Generate a signature (example in JavaScript)
import jwt as sign from 'jsonwebtoken';

const secret = Buffer.from(  // your private RSA key
  process.env.PRIVATE_RSA_KEY,
  'base64'
).toString();

const payload = {
  sub: <YOUR_USER_ID>, // Required
  iss: 'www.webviews.moveo.ai', // Required
};

// The "expiresIn" option adds an "exp" claim to the payload.
sign(payload, secret, { algorithm: 'RS256', expiresIn: '4000ms' });
- Send the data to Moveo by making an HTTP POST request to:
https://channels.moveo.ai/v1/webview/${integration_id}, using the following headers:
headers: {
  Authorization: `Bearer ${signature}`,
  'X-Moveo-Session-Id': sessionId,
  'Content-Type': 'application/json',
}
A successful request returns HTTP 200 OK. Error responses return a JSON body with
error_code, error_message, and status_code fields. Common error cases include an invalid or
expired JWT (401), a missing or expired session (401), or a missing trigger_node_id
(400).
- Finally, close the webview by performing the following:
const closeWebview = () => {
  if (channel === "facebook") {
    return closeFacebookWebview();
  }
  return window.close();
};
Additional utilities
For Facebook, check out the Messenger utility methods to learn more about some methods you could use for your webview.